Tuesday, November 29, 2011

Movember


As Movember comes to an end today, it's time to bid farewell to our furry little friends untill next November.
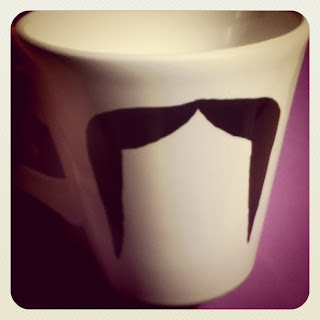
I must admit I am not a particularly big fan of the fake moustache pose that many peeps post on their facebook pages but I do think that the following project (which was inspired by some mugs I saw on I/object) is very cute indeed.

With christmas just around the corner I think these will make adorable little gifts for friends and extended family. Its quick and fun and a suits a small budget

(ok so maybe the mug on its own is a little cheap but what if we include one of these little hot chocolate kits too....yummers)


What you need: A plain mug (colour of your choice)
                         Porcelain paint- I used Marabu porcelain calligraphy painter (air dries. no need
                         for oven) which I bought from my all time favorite store. BHV
                         Scrap paper
                         Pencil
                         Scissors


Step 1: Research and find the moustache shape that you want


Step 2: Either print or draw your favorite moustache on the scrap piece of paper


Step 3: Place your paper moustache onto your mug so that when you hold the mug the moustache faces forward


Step 4: Trace your moustache


Step 5: With a steady hand, use your porcelain paint to draw the outline of the moustache. This is the most important part so take your time and be neat.  Then, evenly fill out the inside.


Step 6: Let it dry overnight
Box weave necklace

Hello all!

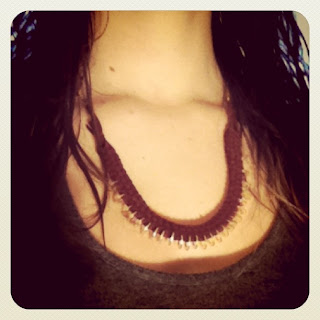
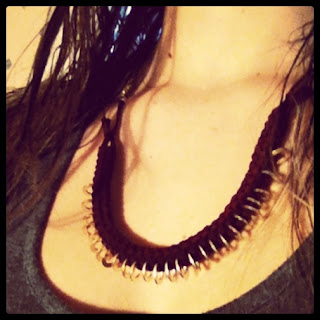
Those who know me, know that I am not much of an accessorizer. I don't wear much jewelry and when I do it's usually only very simple, silver stuff. Well, ever since I've started DIY(ing) that has changed. I can't get enough of big, chunky costume jewelry, especially collar type necklaces. With today's project (inspired by a post on 'honestly wtf')  I am adding another awesome piece to my growing collection.


What you need: +/- 2 hours
                       about 8-10 metres of micro-fibre suede chord.
                       a packet of washers
                      *optional- when I made mine I only used 4 metres of chord which was only about
                       enough to make a bracelet so I lengthened it with a chain.
                  

Step 1: Cut your chord into 4 equally long pieces

Step 2: Knot the four pieces together leaving enough slack to tie necklace behind you neck


Step 3: Lay the ends out in a cross shape (one chord facing North, one chord facing South, one chord facing East, and one chord facing West)

Step 4: Start braiding: fold North and South over to the opposite ends making to loops.

Step 5: Weave West over South and under North. Weave East over north and under South

Step 6: Pull all chords tightly.

Step 7: Carry on weaving for about 7-10 cm then thread one washer through a chord.

Step 8: Weave over the washer, and add the next washer every second weave (always to the same thread going in the same direction)

Step 9: Tie around neck


*extra tip. when weaving the long chords might get tangled so I suggest you roll them and secure them with some rubber elastics to keep them from knotting. ( do not roll the chord on which you thread the washers)

Friday, November 25, 2011

Fur Headband

So I'm sure you've all noticed that fur (or atleast faux fur) is very much in style this winter. As much as I love the new coats that are available realistically, no South African needs a fur coat. Winter just isn't that cold in SA. Buying one now, for my last month in Paris would just be a waste and a mission to get into my, already overloaded, suitcase. Not buying a coat doesn't mean that I can't stay on top of winter's hottest trend, though (haha! get it? cos fur keeps you warm so its hot! i crack myself up sometimes!)

So anyway while I was waiting for my flight back to Paris after some time in London, I found this awesome headband in the Heathrow Accesorize for 24 euros

 
It was the end of the holiday though, so I had no money to buy the beautiful furry accessory :(

A week or two later, while I was walking around the fabric shops near Anvers metro station I came accross some  faux fur in my favorite little mercerie for 16 euros. It was the end of the roll and luckily EXACTLY the width of my head and long enough to make two head bands!!!!

so here's a little tutorial on how to make your own fur headband. 

What you need: sharp scissors 
                         fur (double the width that you want your headband to be)
                         needle 
                         thread the colour of your fur 
                         elastic (only needed if your fur is not long enough to fit around your head) 


Step 1:  fold your fur in half, lengthwise 


Step 2: Sew the two ends together to make a long tube. Some people might want to do this the inside out way  but I found that it was too difficult to turn it out to the right side again. PLUS the fur hides your stitches so if you're not very good at sewing aesthetically (like me) no one will notice! (yay!) 


Step 3: Measure out how much elastic you need (if any) and sew each end of your elastic to each end of your tube. or alternatively (if your fur is long enough) just sew the two ends together. 


Step 4: Wear your new fur headband with pride. 


Warning: 1) thick fur headbands which go over your ears, while keeping them nice and snug, may make
              hearing a challenge
              2) do not consume vodka while wearing headband, unless you want to mistaken for a russian spy 

Paris Street Art

Over the last couple of weeks I've been trying to take my camera out more often while walking the streets of Paris. There are 2 reasons for this. The first is that I will be back home in Hermanus, South Africa, in just over a month's time and I want to capture as much of the city as I can so that I never forget my time here . The second is that there is so much amazing street art in Paris, hiding around the most arbitrary corners. So often I've wanted to kick myself for not bringing my camera with me, so now it stays permanently in the bottom of my handbag.

Here are a couple of works I have seen. Most of them are in the streets of the Marais (1st and 4th arrondissements) and the Montmartre area.

I love this pinoccio made from portraits of different politicians.


 These little guys are everywhere!


I remember being shocked by the amount of graffiti in Paris when I first arrived and while I'm still against the idea of defacing other people's property, I can't help but love these works. They are exquisite and clever and add to the character of the areas where they were found.
Whats your opinion on the subject? Is all street art graffiti? Where should the line be drawn?

First DIY bracelet

I was first inspired to do this project when I saw this post on Honestly WTF 


Being the lazy crafter that I am, I didn't really read the instructions, (It looked easy enough) and headed off to my local bricolage (hardware) store BHV.
Having not read the intructions I did not realise that the hex-nuts I needed were, in fact the smallest ones, and instead I opted for medium sized ones. This error made it very difficult for me to braid the nuts onto my thin string and eventually I gave up plaiting.
I didn't want to waste my pretty golden nuts, though, so I just did the easiest thing, I strung them onto the string without braiding at all, and I kind of like the end result.

If you want to do it the fancy way check out the link above and remember to buy small hex nuts, otherwise you can take the easy route and follow my very simple tutorial

What you need: String (twine) -enough to wrap around your wrist twice
                         Hex nuts- as many as you would like
(if you want to get professional, get yourself a clasp from your local bead shop otherwise just tie your bracelet around your wrist)

step one: (only step really) string nuts onto string


Tie around wrist and wear with pride 


getting started

woo! Im so proud of myself for finally getting this blog going. What do you think of my new header? Its making me feel all proffesional and what not.

My aim for the blog is to post a new DIY/tutorial once a week and share some cool music, clothes, spaces that I've found. I don't think I'm a particularly captivating writer so this is going to be more of a visual diary than anything else. Basically, just a space where I share the things that I adore.

ok, so here I go!

Wednesday, November 23, 2011

Last month in Paris

So this blog was meant to be my project while in Paris to keep my family and friends back home up to date with my life as an au pair. As usual, I procrastinated and so, it is only now, 9 months later (only have one month left) that I am starting it.

I can't believe how quickly the time has gone by. Cliché, I know, but it's true. One moment I was struggling to order my pain au chocolat and navigate the metro then, suddenly, here I preparing to leave this amazing city.

My time as an au pair has been an unbelievble experience. I have learnt so much about the french culture and language  and it is with a heavy heart that I wander the streets these days, wondering if its the last time I'll see certain views.

Anyway, while I've been here I've had quite a bit of free time and have discovered my passion for DIY. So follow this blog if you're interested in my latest projects, my last couple of weeks in Paris and my new adventure at university in the new year.

Please feel free to comment and communicate. I would love to hear from you.