Tuesday, December 6, 2011

Copper and Teal DIY necklace

So I was inspired by a number of things for this project. Firstsly the necklace itself comes from something that I saw on 'PS I made this' and the colours were inspired by the the film Amelie.

I origionally wanted to use ribbon like the version on PS I made this, but when I saw this rope in my favorite mercerie in Montmartre, I knew immediately that It would be perfect. In the photos it comes accross as blue but in real life it is a bright greeny teal.

I'm really excited about this project because it's a really striking piece of jewellery which will brighten up my predominantly black oufits.

What you need: About 1/2 metre of rope
                        copper tubes which you can find in your hardware store's plumbing section
                        sticky-tape
                        clasp which has a catch big enough to fit around the rope
                        *scissors


Step 1: Measure the length of rope that you want. Wrap sticky-tape around the rope just before the point where you intend to cut it. this is so that it doesn't start fraying


Step 2: Slip the bent copper tube to the middle of the rope


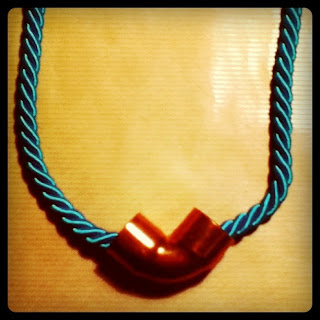
Step 3: Tie two even knots next to the tube


Step 4: Slip the straight tubes on. One on either side of the bent tube.


Step 5: Attach your clasps to the necklace


Wear with pride!!!

Monday, December 5, 2011

Les deux moulins

After school today I went to Montmartre with some friends to have yummmy cupcakes at this adorable little tearoom Miss Cupcake but, unfortunately, it was closed. (on monday mornings most little shops in paris are closed)

Instead we headed to the famous 'les deux moulin' or the 'amilie café' as others call it. It is the same café that Amelie works in in the film and, surprisingly, today was my first time paying it a visit. Apparently they have 3 E 80 Coctails at happy hour so it definately won't be the last time I go there.

Anyway going to the café and spending some time in Montmartre reminded me about how much I adore Amelie so I watched it again for about the 10th time when i got home! I'm not entirely sure what it is about the movie that I love the most. The music is a very important factor, the storyline is so quirky and unusual but I think the best thing about it is how the director, Jean-Pierre Jeunet, succeeds in  creating an absolute masterpiece with every scene.

The teal (ish) green and red(ish) orange which are predominent throughout the film are the inspiration for my next DIY so stay tuned to see what I'm making next!

Sunday, December 4, 2011

Black and gold

I dont know if anyone else experiences this, but I tend to go through major colour phases when it comes to my wardrobe.  When I was about 15 that colour was brown: I had brown boots, brown jerseys, brown jacket, brown handbag brown t-shirts etc etc. Then in my last year or two of high-school that colour changed to grey. All my staples went through a colour makeover and grey became my new best friend.

I dont know if its because I'm a bit older now, or maybe it's just the ever-chic Parisiens who have inspired me, but all of a sudden black has completely taken over. I never used to be able to wear it before. Black always felt too depressing or too mature for me, but now it forms the base of all my outfits.

I'm trying hard not to go head to toe black everyday though. (don't want to be mistaken for an emo)

Last sunday, after brunching with some of my au pair friends at pierre herme (supposedly they have the best pain au chocolate in Paris) I passed by a shoe shop with a closing down sale. I found a pair of (no surprise) black oxford flats for a very reasonable 14,99 E and vowed to spruce them up a bit by painting them. I was a bit undecided about what colour I wanted so I did a bit of research and eventually decided on classic gold. Check out some of my très très chic inspiration.


I have seen loads of shoe makeovers on sites like craftgawker and pinterest and although they all look great, none of them are very specific about  which paint to use and wheather or not the look actually lasts. 
So I decided to take a bit of a risk to share with you what I have used and whether or not it works so that you can learn from my example. 

Ok so here is my DIY

What you need: 1 pair of, preferable cheap or old, oxford flats
                        12 washers
                        1 Marabu Brilliant painter (I chose this pen because it says its suitable for most
                       surfaces including plastic and leather so I hope it will work with my 'pleather'
                       shoes.*)


 Step 1: Outline the areas you want to paint.Take your time and be neat. I like the fact that with the pen you don't need to cover the other parts of the shoe to protect them from the paint, like you would have to do if you used spraypaint.


 Step 2: Fill in the areas with the pen. Make sure to always apply the paint in the same direction. Apply 2 coats


Step 3: Apply washers to the lace holes. If you want to you can glue them but it's not really necessary .

And there you go!


* please note that this project is an experiment and I will be updating with information about the paint. Whether it flakes, is water proof etc. so stay tuned before buying your supplies. 

Friday, December 2, 2011

DIY inspiration: Stars and Stripes

When I was in New York with my host family last month I was really taken aback by how many people had flags outside their homes, shops, busineses. They really are very patriotic people.

America isn't the only place that I have seen lots of stars and stripes, though. Flag shorts, shirts, shoes and other accesories were very popular last summer (july-august 2011) Check out some of these cute flag inspired items and stay tuned for a new DIY next week!