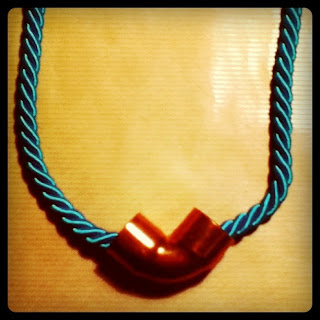
So I was inspired by a number of things for this project. Firstsly the necklace itself comes from something that I saw on 'PS I made this' and the colours were inspired by the the film Amelie.
I origionally wanted to use ribbon like the version on PS I made this, but when I saw this rope in my favorite mercerie in Montmartre, I knew immediately that It would be perfect. In the photos it comes accross as blue but in real life it is a bright greeny teal.
I'm really excited about this project because it's a really striking piece of jewellery which will brighten up my predominantly black oufits.
What you need: About 1/2 metre of rope
copper tubes which you can find in your hardware store's plumbing section
sticky-tape
clasp which has a catch big enough to fit around the rope
*scissors
Step 1: Measure the length of rope that you want. Wrap sticky-tape around the rope just before the point where you intend to cut it. this is so that it doesn't start fraying
Step 2: Slip the bent copper tube to the middle of the rope
Step 3: Tie two even knots next to the tube
Step 4: Slip the straight tubes on. One on either side of the bent tube.
Step 5: Attach your clasps to the necklace
Wear with pride!!!
Tuesday, December 6, 2011
Monday, December 5, 2011
Les deux moulins
After school today I went to Montmartre with some friends to have yummmy cupcakes at this adorable little tearoom Miss Cupcake but, unfortunately, it was closed. (on monday mornings most little shops in paris are closed)
Instead we headed to the famous 'les deux moulin' or the 'amilie café' as others call it. It is the same café that Amelie works in in the film and, surprisingly, today was my first time paying it a visit. Apparently they have 3 E 80 Coctails at happy hour so it definately won't be the last time I go there.
Anyway going to the café and spending some time in Montmartre reminded me about how much I adore Amelie so I watched it again for about the 10th time when i got home! I'm not entirely sure what it is about the movie that I love the most. The music is a very important factor, the storyline is so quirky and unusual but I think the best thing about it is how the director, Jean-Pierre Jeunet, succeeds in creating an absolute masterpiece with every scene.
The teal (ish) green and red(ish) orange which are predominent throughout the film are the inspiration for my next DIY so stay tuned to see what I'm making next!
Sunday, December 4, 2011
Black and gold
I dont know if anyone else experiences this, but I tend to go through major colour phases when it comes to my wardrobe. When I was about 15 that colour was brown: I had brown boots, brown jerseys, brown jacket, brown handbag brown t-shirts etc etc. Then in my last year or two of high-school that colour changed to grey. All my staples went through a colour makeover and grey became my new best friend.
Ok so here is my DIY
What you need: 1 pair of, preferable cheap or old, oxford flats
12 washers
1 Marabu Brilliant painter (I chose this pen because it says its suitable for most
surfaces including plastic and leather so I hope it will work with my 'pleather'
shoes.*)
Step 1: Outline the areas you want to paint.Take your time and be neat. I like the fact that with the pen you don't need to cover the other parts of the shoe to protect them from the paint, like you would have to do if you used spraypaint.
Step 2: Fill in the areas with the pen. Make sure to always apply the paint in the same direction. Apply 2 coats
Step 3: Apply washers to the lace holes. If you want to you can glue them but it's not really necessary .
And there you go!
I dont know if its because I'm a bit older now, or maybe it's just the ever-chic Parisiens who have inspired me, but all of a sudden black has completely taken over. I never used to be able to wear it before. Black always felt too depressing or too mature for me, but now it forms the base of all my outfits.
I'm trying hard not to go head to toe black everyday though. (don't want to be mistaken for an emo)
Last sunday, after brunching with some of my au pair friends at pierre herme (supposedly they have the best pain au chocolate in Paris) I passed by a shoe shop with a closing down sale. I found a pair of (no surprise) black oxford flats for a very reasonable 14,99 E and vowed to spruce them up a bit by painting them. I was a bit undecided about what colour I wanted so I did a bit of research and eventually decided on classic gold. Check out some of my très très chic inspiration.
I have seen loads of shoe makeovers on sites like craftgawker and pinterest and although they all look great, none of them are very specific about which paint to use and wheather or not the look actually lasts.
So I decided to take a bit of a risk to share with you what I have used and whether or not it works so that you can learn from my example.
Ok so here is my DIY
What you need: 1 pair of, preferable cheap or old, oxford flats
12 washers
1 Marabu Brilliant painter (I chose this pen because it says its suitable for most
surfaces including plastic and leather so I hope it will work with my 'pleather'
shoes.*)
And there you go!
* please note that this project is an experiment and I will be updating with information about the paint. Whether it flakes, is water proof etc. so stay tuned before buying your supplies.
Friday, December 2, 2011
DIY inspiration: Stars and Stripes
When I was in New York with my host family last month I was really taken aback by how many people had flags outside their homes, shops, busineses. They really are very patriotic people.
America isn't the only place that I have seen lots of stars and stripes, though. Flag shorts, shirts, shoes and other accesories were very popular last summer (july-august 2011) Check out some of these cute flag inspired items and stay tuned for a new DIY next week!

America isn't the only place that I have seen lots of stars and stripes, though. Flag shorts, shirts, shoes and other accesories were very popular last summer (july-august 2011) Check out some of these cute flag inspired items and stay tuned for a new DIY next week!

Tuesday, November 29, 2011
Movember
As Movember comes to an end today, it's time to bid farewell to our furry little friends untill next November.
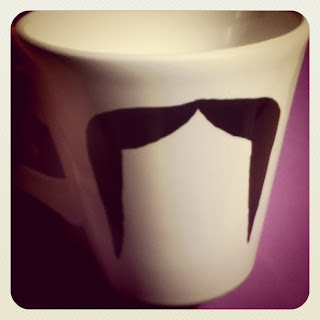
I must admit I am not a particularly big fan of the fake moustache pose that many peeps post on their facebook pages but I do think that the following project (which was inspired by some mugs I saw on I/object) is very cute indeed.
With christmas just around the corner I think these will make adorable little gifts for friends and extended family. Its quick and fun and a suits a small budget
(ok so maybe the mug on its own is a little cheap but what if we include one of these little hot chocolate kits too....yummers)
What you need: A plain mug (colour of your choice)
Porcelain paint- I used Marabu porcelain calligraphy painter (air dries. no need
for oven) which I bought from my all time favorite store. BHV
Scrap paper
Pencil
Scissors
Step 1: Research and find the moustache shape that you want
Step 2: Either print or draw your favorite moustache on the scrap piece of paper
Step 3: Place your paper moustache onto your mug so that when you hold the mug the moustache faces forward
Step 4: Trace your moustache
Step 6: Let it dry overnight
Box weave necklace
Hello all!
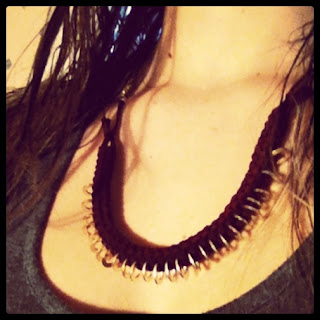
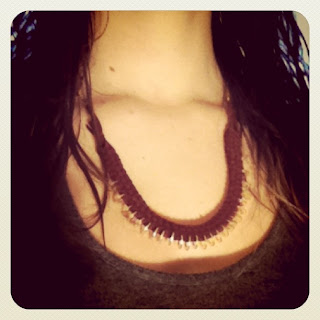
Those who know me, know that I am not much of an accessorizer. I don't wear much jewelry and when I do it's usually only very simple, silver stuff. Well, ever since I've started DIY(ing) that has changed. I can't get enough of big, chunky costume jewelry, especially collar type necklaces. With today's project (inspired by a post on 'honestly wtf') I am adding another awesome piece to my growing collection.
What you need: +/- 2 hours
about 8-10 metres of micro-fibre suede chord.
a packet of washers
*optional- when I made mine I only used 4 metres of chord which was only about
enough to make a bracelet so I lengthened it with a chain.
Step 1: Cut your chord into 4 equally long pieces
Step 2: Knot the four pieces together leaving enough slack to tie necklace behind you neck
Step 3: Lay the ends out in a cross shape (one chord facing North, one chord facing South, one chord facing East, and one chord facing West)
Step 4: Start braiding: fold North and South over to the opposite ends making to loops.
Step 5: Weave West over South and under North. Weave East over north and under South
Step 6: Pull all chords tightly.
Step 7: Carry on weaving for about 7-10 cm then thread one washer through a chord.
Step 8: Weave over the washer, and add the next washer every second weave (always to the same thread going in the same direction)
Step 9: Tie around neck
*extra tip. when weaving the long chords might get tangled so I suggest you roll them and secure them with some rubber elastics to keep them from knotting. ( do not roll the chord on which you thread the washers)
Friday, November 25, 2011
Fur Headband
So I'm sure you've all noticed that fur (or atleast faux fur) is very much in style this winter. As much as I love the new coats that are available realistically, no South African needs a fur coat. Winter just isn't that cold in SA. Buying one now, for my last month in Paris would just be a waste and a mission to get into my, already overloaded, suitcase. Not buying a coat doesn't mean that I can't stay on top of winter's hottest trend, though (haha! get it? cos fur keeps you warm so its hot! i crack myself up sometimes!)
So anyway while I was waiting for my flight back to Paris after some time in London, I found this awesome headband in the Heathrow Accesorize for 24 euros
It was the end of the holiday though, so I had no money to buy the beautiful furry accessory :(
A week or two later, while I was walking around the fabric shops near Anvers metro station I came accross some faux fur in my favorite little mercerie for 16 euros. It was the end of the roll and luckily EXACTLY the width of my head and long enough to make two head bands!!!!
so here's a little tutorial on how to make your own fur headband.
What you need: sharp scissors
fur (double the width that you want your headband to be)
needle
thread the colour of your fur
elastic (only needed if your fur is not long enough to fit around your head)
Step 1: fold your fur in half, lengthwise
Step 2: Sew the two ends together to make a long tube. Some people might want to do this the inside out way but I found that it was too difficult to turn it out to the right side again. PLUS the fur hides your stitches so if you're not very good at sewing aesthetically (like me) no one will notice! (yay!)
Step 3: Measure out how much elastic you need (if any) and sew each end of your elastic to each end of your tube. or alternatively (if your fur is long enough) just sew the two ends together.
Step 4: Wear your new fur headband with pride.
Warning: 1) thick fur headbands which go over your ears, while keeping them nice and snug, may make
hearing a challenge
2) do not consume vodka while wearing headband, unless you want to mistaken for a russian spy
Subscribe to:
Comments (Atom)


